|
The concept of the game is quite
simple, coerce at least four of the six male Ramboids into the
teleport receptor and go to the next chamber after the sixth is
installed. (Avoid the white Ramboids, they don't count)
With a simple concept, these
Ramboids can be a touch unruly in going where you don't want them to.
Hints and tips explains in more detail how they react and strategies
to adopt to be a successful player and the game even has a Chamber
Designer. (Yes in-built in OMAHD II is a maze creator from scratch,
or the option to edit the existing maze, more of this later.)
PC Keyboard Controls explains the
precise keys to use. The game itself uses only the four direction
keys and a fire button throughout.
|
The main menu options which are
self explanatory are:- |
|
START GAME |
Yes, here we start the game |
|
CHANGE CURRENT CHAMBER |
Use password to change the current Chamber |
|
EDIT CURRENT CHAMBER |
Delete objects backwards from the
last installed, then reposition the start positions of the Ramboids
and Droid |
|
REDO CURRENT CHAMBER |
Create a new chamber from scratch.
A 10 second countdown first, allowing the option to fire to abort.
Once this option is chosen, the original maze is deleted, ready for
your own new masterpiece. |
|
SAVE ALL CHAMBERS |
Sorry, this part was never programmed |
|
LOAD ALL CHAMBERS |
Sorry, this part was never programmed |
|
128K MUSIC ON/OFF |
Music toggle switch |
|
Use the up and down direction
controls then press fire to select the option that you want. |
Options within the game
During the game this is the status
game panel.

The energy decreases as the game
progresses and it is wise to change the Droid's mode to FALL, which
gives a little more time. Correctly teleporting Ramboids adds a
little energy, whereas the opposite is unfortunately true for wrong ones.
Up to five blocking rocks the same
size as the Droid can be placed anywhere in the maze. It it wise to
move in the direction you wish to move in after PUT ROCK, as it also
becomes an obstacle for the Droid as well. To the right of the status
panel is a full scale map of the entire maze with red showing the
clear movement areas. Centre of the panel is the chamber number
(1-10) and its password (BEGINS in this example). Pressing fire
whilst playing the game brings up the in game menu options which are
mostly self explanatory. Use the up or down direction keys then press
fire on the selected flashing option.
|
The in game menu options, press
fire to access menu |
|
PAUSE |
Press fire to return to game |
|
FLY |
The Droid stays in the air and
uses a little more energy |
|
FALL |
The Droid naturally falls unless
the up direction is used. Preferred Mode |
|
PUT ROCK |
Press fire here, then move in
desired direction to leave rock behind |
|
RUB ROCK |
Press fire here to erase all rocks
and restore the maze |
|
SEE RAMS |
Press fire here to see a snapshot
where each of the Ramboids are |
|
FOLLOW |
Press fire here and the Droid is
replaced by the current Ramboid to teleport. When in this mode, press
fire again to take control of the Droid. This mode is ideal to
establishing where exactly the current correct Ramboid is and learn
his movement pattern. |
|
RESTART |
Press fire here to reset the
current Chamber. This is the option to choose if 3 Male Ramboids are
put in the wrong order, as a least 4 are needed to progress to the
next level. |
|
SCORES |
Press fire here for a brief look
at the high scores |
|
QUIT |
Press fire here to abort the game
and return to the main menu |
|
Use the up and down direction
controls then press fire to select the option that you want. |

|
The Ramboid Status Panel
The right hand status panel
initially shows a large version of the correct Ramboid to teleport,
above a Chamber statue. As Ramboids are teleported, their images fill
in over the area with the statue (one is shown in this example).
Ramboids teleported in the correct order flash, so that you always
know how many more are needed to progress to the next level.
Remember, At least four of the six male Ramboids must be correct to
progress to the next level. (All six correct gives a whopping energy
boost of over 50% a full tank!) Please also remember that the white
female Ramboids do not count and only serve to make life a little
more difficult and detract energy if they are teleported. It is much
better to leave them behind. (Before
being accused of being sexist, this is all just a little bit of fun
that occurred to me whilst writing these notes.) |
 |
|
Using the in-built maze designer
and editor |
One Man and His Droid II includes
an in-built maze and scenery designer. Earlier games that I developed
needed manual graph paper and co-ordinates to create the different
mazes for the screens. This was all rather tedious and time
consuming. It was better to create some programming that would
simplify the task and I ended up leaving it in the game. Had I found
a publisher for the game, there would have been a restriction on
being able to modify the current level, but as it stands there are no restrictions.
There are two options for the maze
designer, either delete the existing maze and start from scratch or
edit the existing maze. Here is a brief overview of the maze design
screen which explains the various elements.
|
The maze design screen located
in the teleport area for the first maze |
Brief overview of the screen elements |
|
 |
There are 3 operational areas to
this screen. Firstly, top left shows the visual current location plus
the boxed grid areas that have not had any graphics inserted. The
lettered grid helps you find your way around a blank design. The top
right hand column shows the remaining memory bytes that can be used
for new objects The status of the current object, ie. is it solid
(Ramboids cannot pass it) or is scenery, as vertical leaves (Ramboids
and Droid ignore them). Finally, this column shows the current object
that will be inserted, in this example, it is the statue base. The
bottom horizontal third of the screen gives the menu options for the
maze design. |
|
Operational menu options |
Details |
|
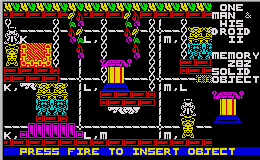
INSERT OBJECT
 |
Pressing Fire when the selected
(flashing) menu option is Insert Object, places the current object
centre screen and gives an additional line of text advising, PRESS
FIRE TO INSERT OBJECT. Before doing this, the movement cursors allow
you to scroll the location of the insert position, to get the item
exactly where you would like it. To demonstrate this point, this
example will cursor down to under the platform, then fire will be pressed.
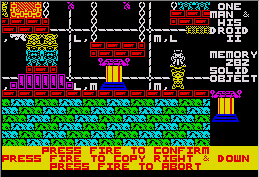
We are now ready to insert the
object, but we do have a few more choices. Simply pressing fire, will
insert the single object and return you to the main menu for the
design module. However, there are also two further options. Copying
right and down allows the single object to be repeated, all in one
easy step. This mode is most beneficial with objects suitable for
creating long platforms. The final option to abort insert, does just that.
In this example, the cursor right
arrow was tapped three times. By using cursor right and cursor down,
a single object can be repeated as many times as you like, but there
is one caveat. If you cursor down, such that a part of an object
would be inserted within the bottom cyan and green bricks, the
insertion is aborted and you return to the main menu. This is a fail
safe to prevent insertion occurring outside of the permitted memory area. |
|
CHANGE OBJECT

 |
Choosing CHANGE OBJECT from the
design menu, replaces the bottom text menu with a series of graphics
that can be inserted.
Using the left and right cursors,
moves the current selection that is displayed. This is shown at the
extreme bottom left and at the bottom of the right hand status panel.
For the second example shown, the
left cursor arrow was tapped three times making, the large multi
colour plant the current object.
Notice how the status of the
object is referred to as a scene object (scenery, Ramboids and Droid
can pass through it).
When the correct graphic is shown
in both locations, press fire to return to the main design menu. |
|
MOVE AND VIEW |
Choosing this option allows you to
scroll the maze to another viewpoint. Press fire to return to the
main design menu. |
|
MOVE AND TEST
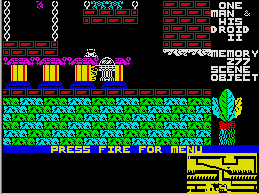 |
This option is similar to move and
view, but the Droid is now centre screen.
In this example, the Droid is
buried in a solid object which will prevent movement left, right, or
down. Thankfully, we can move up, then out.
This mode is very useful to test
running the Droid around the maze to make sure that there are no
unintended restrictions.
Press fire to return to the design menu. |
|
DELETE OBJECT |
This option removes the last
object (or multiple repeated object) that was inserted. It will
progressively step backwards through all the objects that have been inserted. |
|
FINISH & EXIT
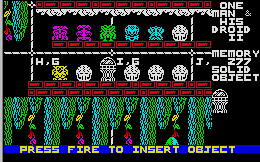 |
Finish and exit does just that,
but first you will notice that one of the Ramboids is centre screen
and the cursor arrows move the maze. It is now the time to choose the
game start positions of the Ramboids and the Droid.
Simply move the Ramboids then
press fire. The six Male Ramboids are installed first, followed by
the five female Ramboids and lastly, the Droid itself. |
|
DESIGN TIPS

E (erase character),
statue base & Ramboid Chute
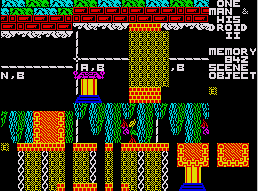 |
From the main game menu, EDIT
CURRENT CHAMBER, allows you to amend the current maze and set the
start locations for the Ramboids and Droid.
From the main game menu, REDO
CURRENT Chamber, erases the current maze ready for your new masterpiece.
If you need to remove an object
placed many insertions ago, one option is to delete backwards all the
way. However, it is simpler to lay a new graphic over the top of the
problem area. Choose the tiny E (erase) character to remove unwanted
bits. The E character will not be displayed during the game.
The statue base is handy as a
Ramboid blocker. On their own, they cannot climb over it, unless they
interact with themselves or the Droid.
Only Ramboids can travel down
Ramboid chutes. Indeed they will always drop down a Ramboid chute,
regardless of their direction mode. |
|
|
By default, One Man and His Droid
II tests to see if a Kempston joystick is attached. If it is then
whatever keys your emulator uses for a Kempston joystick are the ones
to use.
However, if the emulator does not
recognise a Kempston joystick, then both of the two following
strategies are adopted.
Sinclair joystick emulation:-
using the keys 6 - 0
|
Keyboard controls if a Kempston
joystick is not detected |
|
LEFT |
X,V,N |
|
RIGHT |
C,B,M |
|
UP |
Q,W,E,R,T,Y,U,I,O,P |
|
DOWN |
A,S,D,F,G,H,J,K,L |
|
FIRE |
1,2,3,4,5 |
If the Keys are not working, this
is because the Emulator has inadvertently met the test my program
makes for a Kempston Joystick connected. When I designed my games I
wrote a single input routine that runs a test to see if a Kempston
Joystick is connected and if that it true, then it disregards the
keyboard. In this case, you need to select a Kempston joystick in
your Emulators settings, so it can actually use the joystick. |